
Git has become an indispensable tool for version control and source code management in software development. Beyond tracking changes in source code during software development, Git can also be effectively utilized for deploying code to servers. This article explores the basic concepts of using Git for deployment and provides a step-by-step guide to streamline the deployment process using this powerful tool.
Understanding Git Basics for Deployment
Git is primarily used for tracking changes in source code repositories, allowing multiple developers to work on the same project without conflicts. For deployment purposes, Git offers advantages by maintaining a complete history of project changes, which can be pushed to production servers. Understanding branches and Git workflows is crucial; typically, the ‘main’ or ‘master’ branch is used for production-ready code, while other branches such as ‘develop’ are used for ongoing development.
Deploying code with Git involves setting up a remote repository that mirrors the production or staging server’s environment. This setup ensures that any commits pushed to this remote are automatically reflected on the server, facilitating continuous integration and deployment. Utilizing Git hooks, such as pre-receive or post-receive hooks, can automate tasks like running scripts for additional setup or checks before the code goes live.
Security is a significant aspect when deploying code directly from Git. It’s important to manage access rights to the Git repository, ensuring that only authorized personnel can push changes to production. Moreover, using secure protocols such as SSH for transferring data between your local machine and the server adds an extra layer of security to your deployment process.
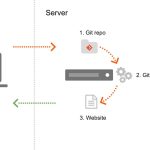
Step-by-Step Guide to Deploying Code with Git
Firstly, ensure that Git is installed on both your local machine and the server. Set up a bare repository on your server, which will act as the central hub for your code deployments. This can be done by running ‘git init –bare’ in a directory on your server. Next, add this server repository as a remote to your local repository using the command ‘git remote add production [server-url]’. This step links your local development environment with the production server.
The second step involves pushing your production-ready code to the remote repository. If you’re working in a team or have multiple branches, ensure that all changes are merged into the main branch. Once your code is ready, use ‘git push production master’ to deploy your changes to the server. This command sends the latest snapshot of the master branch to the server’s repository.
Finally, set up a post-receive hook on your server’s repository. This is a script that Git will execute every time code is pushed to the repository. Typically, this script navigates to the working directory, checks out the master branch, and possibly executes additional commands such as restarting the server or clearing cache. The post-receive hook automates the process of making your code live, ensuring that the latest changes are always deployed without manual intervention.
Deploying code using Git simplifies the software development process by providing a systematic framework for pushing changes to production. By understanding the basics of Git for deployment and following the step-by-step guide outlined above, developers can enhance their deployment workflows, reduce human error, and maintain high standards of security. Whether you’re working solo or in a team, Git offers robust capabilities to ensure that your code deployment is as smooth and efficient as possible.

